Installing the Motherboard, CPU
Line up the ports on the motherboard (PS/2, USB,
etc.) with the appropriate holes in the back panel I/O shield of the case (see
pic below).

Once the
board is temporarily in place, observe which screw
holes in the case line up with the holes in the motherboard. These are where
you will need to place risers if they are not already pre-installed. Remove the
motherboard and insert the risers in the appropriate screw holes.
Step 3: Installing the CPU
Place
your motherboard flat on top of the anti-static bag it came in. Ensure that the
lever on the cpu-socket is
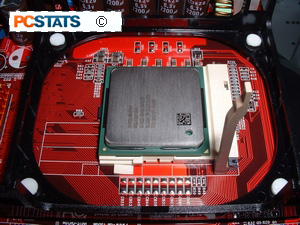
upright (open). Holding the CPU gently on the sides with thumb and fingers, lower it
into the socket, ensuring that the arrow on the CPU matches the arrow indented
into the socket (see pic below). The processor is keyed to fit into the socket
a certain way, and only that way.
Very little effort should be required to insert
the CPU in the socket. If you cannot get the CPU to sit evenly DO
NOT force it. Remove it completely and try again. Ensure that the CPU is
sitting flush with the socket on all sides. No pins
should be visible. Once you are sure the CPU is correctly seated in the
socket, lower the lever until it locks. This will require a small amount of
force.
Note: These instructions will
work for any recent CPU/motherboard combination except for Intel LGA 775
motherboards and processors. Since the pins are built into the socket not
the processor, the installation process is slightly different for these
devices. To install an LGA 775 compatible Intel chip, you first unlatch the lever at the side of the
socket.
This allows you to open the protective cover over
the actual socket and the delicate pins it contains. Be very careful that
you do not touch the actual pins within the socket, as they are extremely
fragile. With the cover open, you can lower the processor into the socket
just as you would any other type of chip. Notches in the socket and an
arrow on both the processor and the bottom left corner of the socket help you
line the processor up correctly. Once the chip is seated properly in the
socket, you can close the protective cover and re-latch the lever.
Otherwise, the orientation of the CPU may be
different, but the method of inserting it is the same for older socket chips;
whether they be Intel, AMD or VIA processors. This guide does not cover
slot-based processors, as they are no longer used.
|
< Previous Page
|
© 2025 PCSTATS.com
Please respect the time and effort that went into creating each PCSTATS Beginners Guide, do not illegally copy. Thank you.
|
Next Page >
|
|