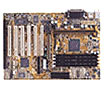
The P5S-B's layout looks similar to any other AT based
board. Well, I only wish I could say that. I do have several comments
on this issue which should be made known. Here we go... The DIMM slots are
located on the right side of the board just behind the AT and
ATX power connectors (taking the side of the keyboard connector as the front). I
couldn't figure out why the HDD connectors are located where they are, right smack in the
middle of the board. Normally, the floppy drive connector is situated along with the
hard drive connectors, but not in this case.
Instead the FDC is positioned at the front end of
the board to the left of the AT/ATX power connectors. So far so bad? Looks like
that the board's layout was taken care of by amateur LEGO enthusiasts. But
that's not the end of it.
The on-board VGA header is placed
right behind the ATX power connector and the 2 boxes of DIP switches reside in what looks
like random positions of the board. DIP switch box number 1 is snuggled up
against the Primary IDE connector which makes it pretty difficult to access, especially within
an AT cabinet where the cables do not share much real estate. DIP
switch box number 2 was pretty accessible and so was the CPU. Since the HDD cable
parking is where it is, there is a lot of overlap across half of the
board, not to mention the isolated FD cable connection.
So in short, lots of cable clutter which hinders
proper airflow within the cabinet. If you decide to use an AT cabinet, you are
in enough trouble already without the jungle of cables adding to it. Boy... You
would think that a such a popular company like Asus would have had this taken
care of. The SiS 530 chip sported a green heatsink, this is probably the most
visually stunning aspect of the board.
Surrounding the Socket 7 interface (which, by the way, IS in a
good location on the board ;)...) are 3 really tall 1000uF capacitors. Only 3?
Nah, a couple of more 500uF caps are in the vicinity as well. This particular
version of the P5S-B did not come with any on-board display cache RAM nor
is it equipped with the optional ESS Solo-1 audio
chip.
What it does come with is a TV-Out which is pretty nifty if you find that
TV-Output suits your preference. Oh yeah, there is also a LCD Header as well. In
my opinion, if you can afford an LCD display, I really don't think you would be
purchasing this board in the first place. There is one thing that I really
didn't like about this board. And that is there is one header which is shared
between 3 possible devices. It is intended to host either a PS/2 mouse, a USB
device, or an IrDA peripheral. But since most of us don't use all 3 at once, I
might just let that one pass.
The 2 DIP switch boxes are where your speed
/ voltage / core ratio and other settings take place. And mind you, these are
extremely flexible. In the "other settings", you can turn on/off your local
frame buffer (if available) and allocate up to 8MB of system memory for your
video display. You can even turn your on-board video off if you want to use your
own PCI-based 3D accelerator. Other features controlled with the DIP switches
are turning off/on of the on-board audio, TV-Out and LCD. Now let's move on to
the speed / voltage/ core ratio setting we saw earlier. (Talk about
multi purpose DIP switches)
The one cool thing about these DIP
switches is that they are there to adjust speeds of different components at your
every whim. With the P5S-B, you can adjust the speed of these components
independently of each other. For example, you can set the CPU clock at 66/75MHz
while having your SDRAM running at 100MHz.
This is of course, similar to newer BIOS's which
let you run your memory at HOSTCLK+33MHz. You can even go further by pushing the
CPU clock to 112MHz and having your memory run at 74MHz. You get the idea. The
rest is in your hands. Multiplier ratios supported go up to 5.0x. Not really
alot, but you do have a 112MHz FSB option to play around with. In addition,
voltage supported range from 2.1V to 3.5V in 0.1V increments to give the CPU
some more juice while overclocking. In short, decent overclocking
potential.