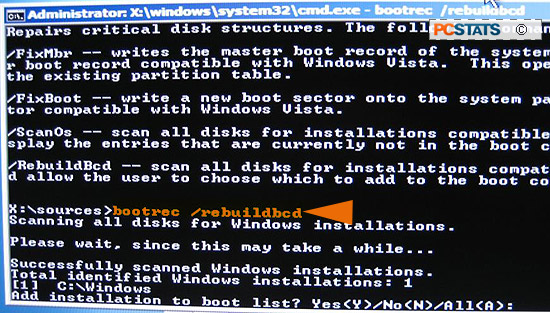
After the last two commands, what we need to do is to integrate the
'missing' Vista install back into the Vista boot loader. To do this, we
use another bootrec command. From the command prompt, type 'bootrec
/rebuildbcd' and hit ENTER.
You will be prompted to add the Vista installation(s)
to the BCD table. Type 'y' for yes. If the
operation completes successfully, exit the command prompt and reboot the computer, then load
the recovery environment again. Vista should now be detected by the
recovery environment. Now you can either proceed with the Vista repair
process or try to boot Windows Vista normally again.
If you received an 'element not found' error, see the heading below.
'Element not Found' error?
If you've received this error while using the bootrec commands, it
generally means the hard drive partition you are attempting to boot Windows Vista
from is not 'active', meaning essentially that it is not bootable. The computer
needs the partition that contains the Vista boot loader to be set to active
before you can go any further.
To make Vista partition active, open the Vista recovery environment
command prompt. At the command prompt, type 'diskpart.' This
will get you to the DiskPart prompt, which allows you to use a variety of hard
disk partitioning and formatting tools similar to FDISK in older versions of
Windows.
At the DiskPart prompt, type 'select disk #' where the # sign is the number
of the hard disk drive with Vista installed on it. How do you figure this
out? Easy, if your Vista drive is the only hard drive in your computer, it
is Disk 0. If you had an original hard disk with another operating system,
then added another hard drive and Windows Vista later on, then your Vista drive
will be 'drive 1' and so on.
Now that you have selected your Vista hard drive, select the partition by typing
'select partition #' where the # sign is the partition that has Vista installed
on it. If your hard drive has only one big partition using all the space,
type 'partition 1'. Otherwise, the remainder of the partitions on the disk
are numbered in sequential order from 1 onwards.
Now that you have the Vista partition selected, type 'active' and press
ENTER. The Vista partition is now active. Finally, type 'exit' to
close DiskPart. Reboot the computer and reload the recovery environment,
then repeat the bootrec commands listed above. You should receive no error
messages this time.