When you sit down to install a new case with all of your
computer hardware, that's when you really know if you've got a good chassis or
not. Sliced fingers, inaccessibility, and complicated brackets can all
frustrate the steps need to make a pile of computer gear a computer.
Here are a couple of the things we noticed when going about the steps for an average installation.
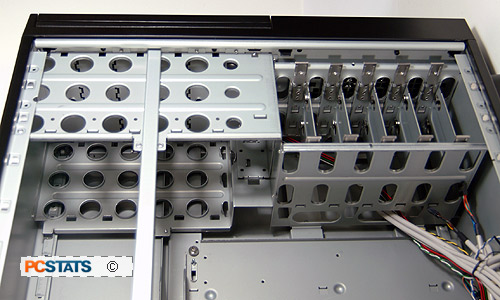
The hard drive racks at the front of the iStar
Nitro AX case take up a lot of space from the motherboard area, so you may find
it easier to leave the motherboard tray in place and install the motherboard in the standard fashion. All of
the PCI expansion slot covers are locked into place by a single green tab which
secures a swivelling locking mechanism. When this is opened, you can easily
remove the individual PCI bracket covers and install the computer's PCI Express
and PCI cards. Closing the tab locks the expansion cards in place. We
really liked the tooless approach here.
|

The PCI brackets are held in
place with this tool free retention mechanism.
|
Installing 5.25" devices is a snap with iStar's rail system. First remove the
two rails from the underside of the plastic bezel cover, and screw them onto either side
of the optical drive. Each drive slides into the frame with a satisfying click,
and removal is just as quick. The five internal 3.5" drive bays are set at a
90 degree angle to the rest of the drives in the system, with the
motherboard in place these five hard drives are still just as accessible and connecting up cables
is dead simple.
|
To install 5.25" drives, simply slide them in
through the bezel until the rails click into
place.
|
To install a hard disk, we first pull out one of the drive trays and screw
the hard drive in place. The whole contraption slides back into the rack, and
the springy clips keep it firmly locked in place. We appreciated the vent holes
punched into the side of the hard disk rack. With a fan installed at the front
of the case (optional), a nice breeze of cool air will blow across all of the
hard drives.
|
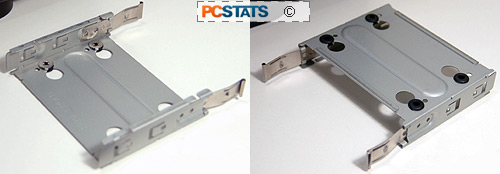
The hard drive trays have rubber vibration reducing mounts on the bottom that can help reduce hard drive noise from occuring.
|
We
installed a power supply for testing and powered up
the case with the nondescript black power button hidden under the front bezel door.
The rear fan on the iStar Nitro AX case came to life, and was satisfyingly quiet... well it only has one fan after all.
