PCSTATS     
[X]   Directory of
Guides & Reviews

Beginners Guides
Motherboards by Brand
Weekly Newsletter
Archived Newsletters

+70 MORE Beginner GUIDES....
Beginners Guide: Fujitsu Lifebook P770 Memory Upgrade
Beginners Guide: Fujitsu Lifebook P770 Memory Upgrade  - PCSTATS
There comes a point in every notebooks lifespan when it's time to upgrade the memory. Follow along as PCSTATS outlines the steps to upgrade the P770's hidden memory slot.
Filed under: Beginners Guides Published:  Author: 
External Mfg. Website: Crucial May 17 2012   Max Page  
Home > Reviews > Beginners Guides > Crucial Fujitsu Lifebook P770

Step 3c) Putting it back Together Again

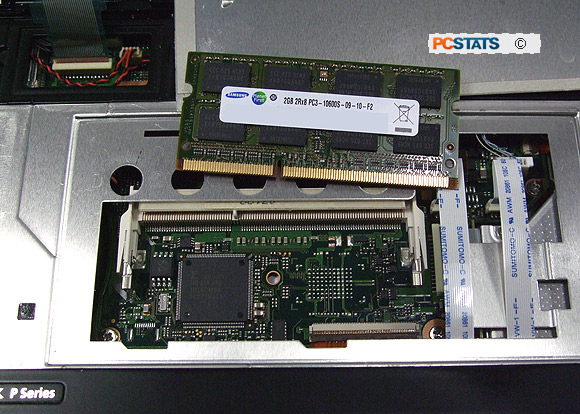
The 204-pin SODIMM module is keyed to only fit in one way, just be sure to insert the memory into the socket so that most of those gold pins are no longer visible. Two springs put tension the memory module as you push down on it so there will be a small amount of resistance. Push it down all the way until the two clips click into place. There is one on either side of the memory module PCB which lock the RAM in place.

Swap out or upgrade the hidden memory module as needed, then replace the aluminum panel cover and tape it back in the locked position.

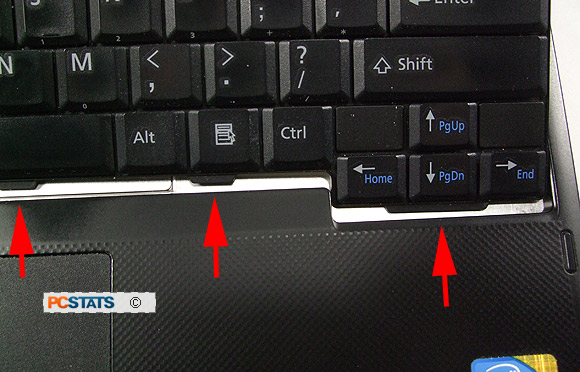
The keyboard should slide back into place bottom first so the locking tabs engage with the notebook chassis. Press the keyboard down lightly to make sure it's fully seated and the adhesive squares are in contact with both aluminum surfaces. The next step is to replace the chrome plated plastic strip which locks the keyboard in. That plastic strip needs to be inserted in its groove so each of the tabs engage.

In the photo below is a closer look at the tabs on the strip and slots in the chassis the tabs engage with.

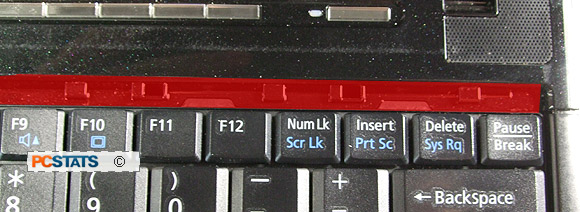
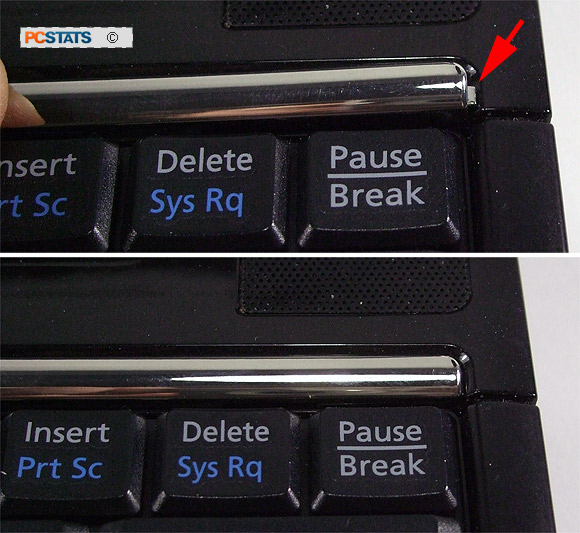
Install the chrome plated plastic strip and slide it a few millimetres to the left so all the tabs engage. The right corner of the chrome plated plastic strip will be sticking out still, as detailed in the photo below.

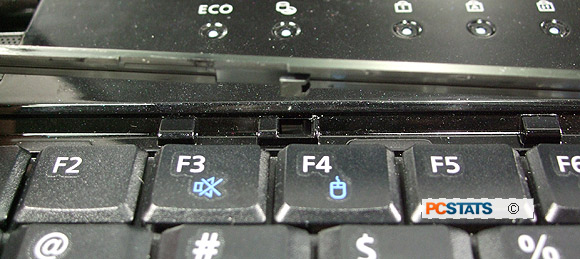
Push the right-hand end of the strip in towards the left a little, to get the little nub of plastic pointed down, the tab should then pop into place in the notebook chassis. When it's flush to the black plastic frame, it's installed.

WARNING - If that little bit of plastic is not installed properly and is not flush to the rest of the notebook, it may crack the LCD display when the screen is closed!

That's it! The only other step is to power up the notebook and ensure the full memory capacity is reported in the BIOS. Thanks to Crucial Memory for help with this DIY Guide.

If you have any comments or questions, please post them in the PCSTATS Forums. Find out about this and many other reviews by joining the Weekly PCSTATS.com Newsletter today! Catch all of PCSTATS latest hardware reviews right here.

PCSTATS
- 99 Windows Vista Performance Tips and Tweaks
- Windows Vista Crash Recovery and Repair Installs
- Making Old Software Compatible with Windows Vista
- Installing Windows Vista
- Safe Mode in Windows Vista For Crash Recovery
- Stopping Vista From Thrashing Hard Disks to Death
- How to Install Intel Socket 775 CPU and Heatsink
- How to Install Intel Socket 1366/1156 CPU and Heatsink
- How To Install/Remove AMD Socket FM1 CPU and Heatsink
- 10 Steps to a Secure PC
- 101 Tips and Tweaks for Windows XP
- 104 Killer Tech Tips for Windows XP
- 99 Performance Tips for Windows XP
- Annual PC Checkup Checklist
- Assembling Your Own PC
- Back up and Restore Data in WinXP
- Browser Hijacking and How to Stop it
- Building a Home Theatre PC / HTPC
- Burning CDs and DVDs
- Cloning WindowsXP
- Converting Videotape Into Video Files
- Crash Recovery: The Blue Screen of Death
- Creating a Weblog / Blog
- Creating MP3 Music Files
- Decrypting Lost Document & Zipped File Passwords
- Diagnosing Bad Hard Drives
- Diagnosing Bad Memory
- Dual OS Installation of WindowsXP 32-bit/64-bit
- Encryption and Online Privacy
- Ergonomics & Computers
- Flashing a Video Card BIOS
- Flash Memory Data Recovery and Protection
- Firewalls and Internet Security
- Firewall Setup and Configuration
- Forgotten Passwords & Recovery Methods
- Formatting and Partitioning a Hard Drive
- Fundamentals of Upgrading a PC
- Hard Drive Data Recovery
- Home Networking and File Sharing
- How to Fix Homesite Design Mode to Work in WindowsXP/ Vista
- How To Make a Budget Desktop Computer on the Cheap
- How to Update a Motherboard BIOS
- Installing RAID on Desktop PCs
- Installing WindowsXP

- Internet Connection Sharing
- Legally Copying Software and Music
- Linux Part 1: Getting Familiar
- Linux Part 2: Installing a PC
- Linux Part 3: New Software
- Little Known Features of WindowsXP
- Making DVD Movies from Video Files
- Most Common Ways to Kill a PC
- Optical Drives & Recording Formats
- Overclocking the CPU, Motherboard & Memory
- Overclocking the Videocard
- Preventing Data Theft from a Stolen Laptop
- Printer Sharing on a Home Network
- Quick Guide for Eliminating Spyware and Hijacker Software
- RAM, Memory and Upgrading
- Registry: Backups, Repairs, and Protection
- Remote Access to Computers
- RSS Feed Setup & Subscriptions
- Setting up an FTP Server in WinXP
- Slipstreaming WindowsXP with Service Pack 2
- Spyware Protection and Removal
- Stopping Spam
- Synchronizing Files and Folders
- Unattended Windows 2000/XP Installations
- Understanding & Creating Batch Files
- Understanding & Tweaking WindowsXP Services
- Upgrading A Motherboard Without Reinstalling
- Upgrading Win98 to Windows XP
- USB Memory Drive Projects & Tips
- VPNs and Internet Connection Security
- Website Hosting From A Home PC
- Website Hosting With Apache
- Windows XP Command Prompt
- Windows XP Safe Mode Explained
- Wireless Home Networking
- Wireless Network Security

Got an idea for a Guide we haven't already covered? Send it in.

< Previous Page © 2023 PCSTATS.com
Please respect the time and effort that went into creating each PCSTATS Beginners Guide, do not illegally copy. Thank you.
Beginners Guides Reviews...»


Contents of Article: Crucial Fujitsu Lifebook P770
 Pg 1.  Beginners Guide: Fujitsu Lifebook P770 Memory Upgrade
 Pg 2.  Step 3.) Installing the Hidden Memory Slot
 Pg 3.  Step 3b) Removing the keyboard
 Pg 4.  — Step 3c) Putting it back Together Again

 
Hardware Sections 


PCSTATS Network Features Information About Us Contact
FrostyTech
PCSTATS Newsletter
Tech Glossary
Technology WebSite Listings
News Archives
(Review RSS Feed)
Site Map
PCstats Wallpaper
About Us
Privacy Policy
Advertise on PCSTATS

How's Our Driving?
© Copyright 1999-2023 www.pcstats.com All rights reserved. Privacy policy and Terms of Use.