Chances are some of you will be familiar with the grinding halts, crashed
windows and other joys of having your computer act as a print server for an
entire office of print-crazy co-workers. Aside from the annoyance, a sudden load
on your machine can sometimes cause it to crash... joy of joys. But never fear,
where there is a need there is always a little electronic goody to come to the
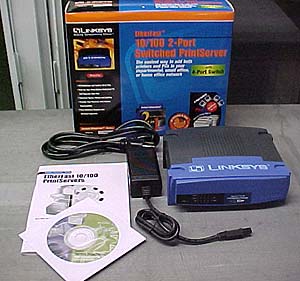
rescue. In this case, it's the LinkSys EtherFast PrintServer. With two parallel
ports, and a 4-port hub it connects directly to the network to handle all print
jobs.
 |
The 2-port print server comes with the following:- Print Server
- Power Cords
- Instruction manual
- Driver CD
- Cost ~$90 USD
|
Installation:
Installation of the print server is not too difficult, but we found the
instructions rather unclear so it did take us a couple of tries before
everything was working properly.
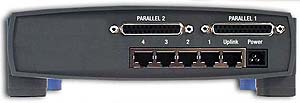
The first step is to make sure the print server is connected to the LAN using
the right kind of Ethernet cable. There are five jacks on the back of the server
to choose from. By connecting a pass-thru Ethernet cable to the "uplink" RJ-45
jack, and the other into your network the unit will have proper connectivity. If
you had connected the cable to any of the other jacks it would not be able to
properly communicate with the network, leaving configuration impossible.

With the wires connected on machine must be set to configure the print server
on the network. This requires the software to be installed, and the IP address
to be set for the particular print server. This is where things become a bit too
vague in the instructions. We had to try this a few times before we figured it
out entirely.
First....
First we had to make sure we selected to install the "TCP/IP setup program"
so the print server would be visible under our networks' current configuration.
With the software installed we could specify the IP address, gateway and subnet
mask. Additionally the "device name" need to be specified. Here once more the
instructions are a bit vague, but essentially a sticker on the back of the
print server has a 8-digit number which plugs into the software. Once the device
has been set, you can go back to the "configure print server" window and choose
the device so your computer knows where to send print jobs.
Its a bit confusing the first time, but for any additional computers on the
network it just takes a few seconds to load the drivers and begin using the
print server.

