Before we
begin cloing your operating system hard disk to another disk in the same
computer, we'll need install the new hard drive. If you have already done this, you can skip
ahead to the next section that covers the different cloning software programs.
To
install a new hard drive in your computer, first turn off the power and open up your
computer. If you are using an
IDE hard drive, we'll be installing the new hard disk as a secondary hard
drive in the PC. Most motherboards will have at least two IDE connectors. Each of
these can accept two hard disks or CD drives using a single 80-pin IDE
cable with two connectors. Examine your computer's current configuration by
taking the side panel off.
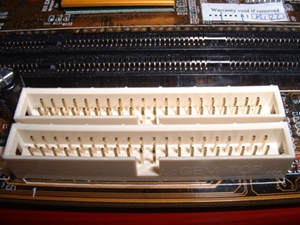
For reference, IDE ports look like
this:
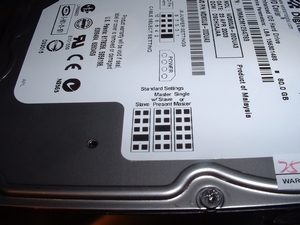
Examine the top of your
hard-drive. There should be a chart depicting the necessary jumper
settings to make the drive a master or slave device. Otherwise, the chart will
be somewhere on the body of the drive.
If you
are plugging the new hard drive into an IDE cable which has no other drives
connected to it, you need set the jumpers to the 'master' setting. If there
is already a single CD drive or hard disk connected to the IDE port you wish
to use, set the 'slave' jumper setting on your drive. It's also a good idea
at this point to look at any devices already connected to the same cable
and make sure they are not also set to the same master or slave setting as the
new drive.
The
jumpers which need to be adjusted are on the back end of the drive as pictured below.
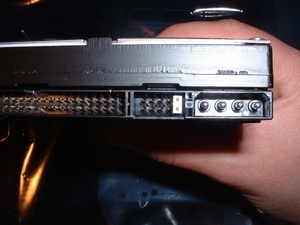
Ensure that they are set
correctly to enable the drive as a master or slave drive as necessary. Insert the
drive into the drive-tray and screw it in
securely on both sides. Attach the power cable to the drive, and then
the IDE cable. The IDE cable
is keyed to only fit in one way, but to make sure, the red or blue line on the
cable should be facing toward the hard drive power cable.
Reboot the computer and press
(del) at the POST screen to enter BIOS configuration. Depending on your
motherboard, either go to basic CMOS setup or auto-detect IDE devices if this
option is available. With either option, your new drive should be visible in the
slot you installed it (i.e. Primary master/slave, secondary master/slave) and
should show the full available size of the drive.
Newer
SATA (Serial ATA) drives will auto
configure themselves once installed. If your motherboard can accept these
drives, your manual will say so. Once the new hard disk is successfully installed as a
slave drive on the primary channel, it's time to run the disk cloning
software.