Provided you have the space, a new hard drive is a straightforward
modification. It's not really an upgrade per se, as it won't give your computer any
boost in speed unless you reinstall Windows on the new hard drive, and
even that will be fairly minimal. What it does do is give you lots of
space to play with. And as any user of broadband Internet knows, you can
never have too much space.
There are a few things which need to be understood
before you do the upgrade though. First off, if you have an older computer, (say anything older
than a Pentium III as an estimate.) you can attach a newer 40GB or larger
hard drive, since IDE standards are still the same, but your motherboard may not be
able to see the hard drive completely. For example it may interpret a
40GB drive as a 20GB since that is the largest it is able to handle
with its settings. There is a way around this, which we will return to
after we install the drive.
Secondly, you need to make sure that your
new drive's jumper settings work with the other drives in your computer. Each
IDE port on your mainboard can support two devices, one of which needs to be
designated the 'master' device, and one the 'slave.' This is set through jumpers on
the back of IDE devices.
Examine the top of your
hard-drive. There should be a chart there depicting the necessary jumper
settings to make the drive a master or slave device. Otherwise, the chart will
be somewhere on the body of the drive.
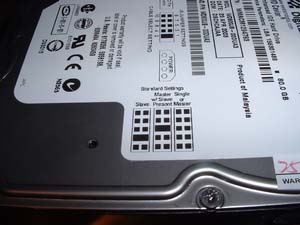
The set of jumpers will be on
the back end of the drive.

Ensure that they are set
correctly to enable the drive as a master or slave as necessary. If you already
have one device attached to the particular IDE port and you are unsure whether
it is set as the master or the slave, check the boot up screen again for a list
of each device and its position.
You may need a set of tweezers
to move the jumpers around if you have been biting your fingernails. Insert the
drive into the drive-tray and screw it in securely on both sides. Attach the
power cable to the drive. Attach the IDE cable to the drive it will be keyed to
only fit in one way, but to make sure, the red or blue on the cable should be
facing the hard-drive power cable.
Reboot the computer and press
(del) at the POST screen to enter BIOS configuration. Depending on your motherboard, either
go to basic CMOS setup or auto-detect IDE devices if
this option is available. With either option, your new drive
should be visible in
the slot you installed it (i.e. Primary master/slave, secondary master/slave) and should show the
full available size of the drive. If the drive does not appear at
all, power off and check your jumper settings.