Before you do anything else, make a note of your
drive's manufacturer and model #. This might end up coming in handy.
As we said before, Each IDE controller can support up to
two devices attached to a single cable, meaning for each IDE connector on your
board, you can have two hard drives, or a hard drive and a CD drive, or any
other combination that strikes your fancy. The controller has to have a
way to tell these drives apart though, which is where the preparation comes
in.
Each IDE drive must be identified as either a master or a slave
device. One master device and one slave device can be attached to each IDE
connector. Hard drives and CD drives must be configured manually to be either a
master or a slave. This is accomplished by means of jumpers
located either on the rear or the bottom of the drive.
Most IDE hard drives have the jumpers set to the master position by
default. To determine this, examine the top of your hard drive. There
should be a chart there depicting the necessary jumper settings to make the
drive a master or slave device.
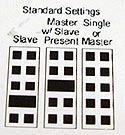 Otherwise, the chart will be somewhere on the body of the drive.
Depending on the make and model of the drive, there may be up to four
options:
Otherwise, the chart will be somewhere on the body of the drive.
Depending on the make and model of the drive, there may be up to four
options:
Master: This indicates the jumper position necessary to make the drive
the master device on the cable.
Slave: This indicates the jumper position necessary to make the drive the
slave device on the cable.
Slave present, or 'master, slave
present': If your drive has this
setting, and you plan to make it the master drive and add another hard disk or
CD drive as the slave, you must set the jumpers to this position. Newer
drives generally do not have this setting, which is simply covered by the
'master' setting instead.
Cable Select: This setting enables the IDE controller to determine which
device will be the master and which the slave depending on their position on the
cable. It's better to set your drives manually to be certain which is which, so
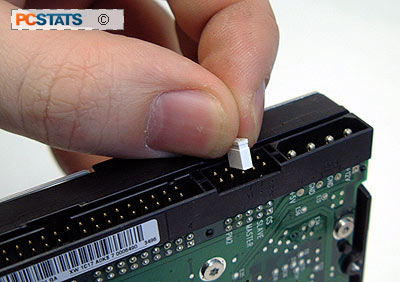
avoid this. Set the jumpers before actually installing the drive into the case.
You may need a pair of tweezers to move the jumpers if you are a fingernail
biter.
There is no performance advantage derived from your new
hard drive being in either the master or slave position, so how you set the
jumpers should be merely a question of where you are fitting the drive into your
system. If you have a single hard disk or optical drive already attached
to an IDE cable and you want to add your new disk to that cable, set it to the 'slave' jumper position. If you
are adding your new drive as the first IDE device on a new cable,
then set it to master, etc.
Once you have the jumper
set correctly on the back of the drive, it's time to install your new IDE
hard disk into your computer case.