The first option we will explore now that we have access
to the compatibility tab is the 'compatibility mode' setting at the top. As it
says in the screenshot below, the various compatibility modes available in the dropdown box emulate certain features of older
Windows versions, hopefully allowing your program to run successfully.
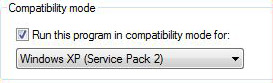
To set a compatibility mode for your program, check the 'run this
program in compatibility mode for:' box and then choose an operating system that
is compatible with your software from the dropdown box below. Finally,
click 'ok' and then double click the application (.exe) file for your program to
attempt to run it.
It's important to note at this point that there are some types of
programs that you should not attempt to run in compatibility mode. Anything that
needs access to system files or changes system settings (good examples being
antivirus/spyware programs or disk partitioning software) should never be
run in compatibility mode, as the changes the programs will attempt to make
could potentially damage Vista as a whole.
 Compatibility mode in Windows
Vista is not a cure-all. What this tool does is 'fool'
your program or installation file into thinking that its being installed onto
a compatible operating system.
Compatibility mode in Windows
Vista is not a cure-all. What this tool does is 'fool'
your program or installation file into thinking that its being installed onto
a compatible operating system.
It does not
actually make any changes to the way Vista works to assist legacy programs.
This means that applications which require access to system files that
are non-existent, or have been relocated, will fail whether you use the
compatibility mode or not.
Installing Programs in Compatibility
Mode
Some software that is incompatible with Windows
Vista will require the compatibility mode to be enabled before it can even be
installed. To do this, locate the .exe file used for installing the program;
it will appear as an 'application' file in Vista Explorer as
referred to above, will generally be found in the root directory of the installation
CD and will probably be called something like 'setup'.
Once you have found this file, right click on it
and choose 'properties' then set the appropriate compatibility mode as detailed
above. Note that you will still have to set the compatibility mode for the
program's application file separately once it has been installed.
Other Compatibility Options
As you've noticed, there are some other options in the program compatibility
tab.
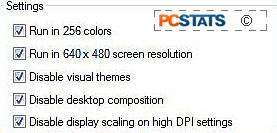 Let's run through them quickly:
Run in 256 colors
This does exactly what you'd think, allowing you
to drop the Vista display mode to 256 colours for this specific program only.
A lot of early Windows 95/98 based games require this, especially children's
programs.
Generally
speaking, you will know if you need to set this option, since programs that
require 256 color mode will fail with an error message indicating the
problem.
Run in 640 x 480 Screen Resolution
This option allows you to reduce
the on-screen resolution of Windows Vista below the minimum of 800x600 for this
specific program. As with 256 colour mode above, many older Windows-based programs expect a resolution
of 640x480 only, and Windows Vista will not give it to them
unless this option is enabled. You may not get an error message indicating that
this is a problem, so it's worthwhile to try this setting
out if you have not yet managed to get your older Windows program to
run.
Programs affected by this
limitation will generally be older games that do not run in 'windowed' mode on
the desktop, but rather in 'full-screen' mode. You should definitely try
this out if your program works but the graphics appear distorted, too small or
stretched.